As a Shopify merchant, you probably already know that volume discounts are a low-hanging fruit when it comes to moving inventory & increasing your average order value (AOV). So, if you’re looking to set up volume discounts on your Shopify store, you’re in the right place! In this guide, I will walk you through how to set up volume discounts, both with & without using any apps.
Especially for those who want more flexibility and automation, I will also highlight some of the best Shopify volume discount apps that can help you create more advanced volume discount campaigns.
Let’s dive in and explore how you can set up Shopify volume discounts to drive more sales and happier customers.
What is a Shopify Volume Discount?
Volume discounting is a pricing strategy where customers are rewarded with lower prices when they purchase larger quantities of a product from a Shopify store. This approach, often called a "quantity discount," encourages shoppers to buy more by reducing the per-unit price as they increase the items in their cart.
Volume discounts can be tailored in different ways, such as offering higher discounts at multiple purchase thresholds or bundling products at a set rate. The main goals are to increase average order value, move inventory efficiently, and incentivize both retail and wholesale customers to place larger orders.
How to Set Up Volume Discounts on Shopify
Adding volume discounts to your store doesn’t have to be complicated. Whether you want to build them natively inside Shopify admin or prefer the advanced capabilities of Shopify apps, this section will guide you through both approaches so you can choose the one that fits your requirements.
1. How to Set Up Volume Discounts on Shopify Without an App
Here is a detailed step-by-step guide for setting up volume discounts directly within you Shopify admin panel using Shopify Native discounts:
Step 1: Log in to Shopify Admin and Open Discounts Section
Start by logging into your Shopify admin panel. From the dashboard, locate and click on the Discounts tab in the left-hand menu. This is where you will manage all store promotions.
Step 2: Create a New Discount
Click the Create discount button located on the Discounts page.
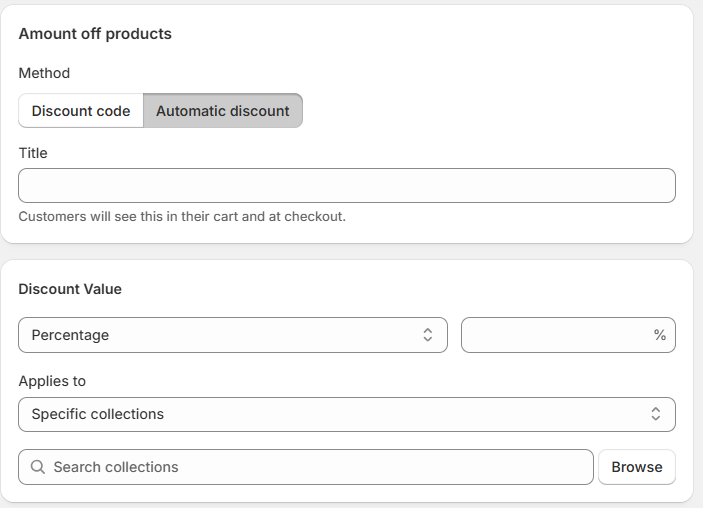
Step 3: Select Discount Type
Choose the type of discount you want to offer to your customers. In this example, let’s choose “Amount off products”. This lets you offer discounts to specific items based on their quantity.
Step 4: Set Up Discount Method & Title
Under "Method," you must decide how the discount will be applied. You have two choices here.
Discount code: The customer must manually enter a code at checkout to receive the discount. If you choose this, you will need to enter a specific code (e.g., "SAVE10") or use the "Generate random code" option.
Automatic discount: The discount applies automatically once the cart meets the specified conditions.
Title: Give your discount a clear and descriptive title, such as "Buy 3 & Get 10% Off." This title is visible to customers in their cart and at checkout, so it should be easy to understand.
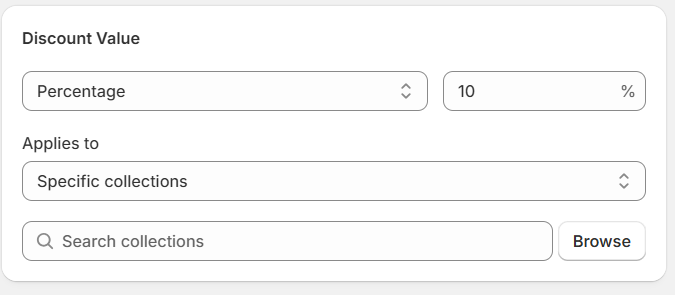
Step 5: Set the Discount Value
In the "Value" section, specify the nature of the discount. You can choose either a "Percentage off” or a "Fixed amount off”.
Use the "Applies to" section to determine which items are eligible. You can select "Specific products" or entire "Specific collections."
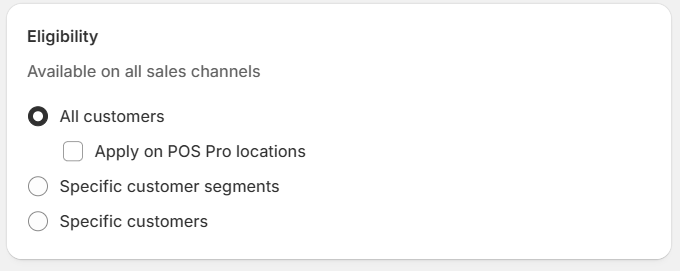
Step 6: Define Customer Eligibility
Under the "Customer eligibility" section, you can control who can take advantage of this offer.
Everyone: The discount is available to all customers.
Specific customer segments: Limit the discount to predefined groups of customers (e.g., new customers, loyal customers).
Specific customers: Limit the discount to specific, individual customer accounts.
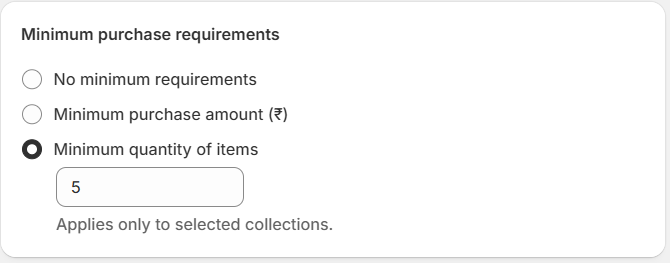
Step 7: Establish Minimum Purchase Requirements
In the "Minimum requirements" section, you can choose one of the following conditions:
No minimum: The discount applies to all orders without restrictions.
Minimum purchase amount: The discount only activates when the cart total reaches a set value.
Minimum quantity of items: The discount applies once a customer adds a specific number of items to their cart.
Step 8: Manage Discount Combinations
The "Combinations" section lets you decide if this discount can be used alongside other promotions, such as order or shipping discounts.
Step 9: Define the Active Dates
Specify the promotion's duration by setting a "Start date" and an optional "End date" under the "Active dates" section.
Step 10: Save Your Discount
Once you have configured all the settings, click "Save" to save the promotion.
Limitations of Shopify Native Discount
Shopify's native discount system has certain limitations that you should be aware of when planning promotions:
Limit of 25 Active Discounts
Shopify restricts stores to a maximum of 25 active discounts at any given time. While this may work for smaller shops, it often becomes a roadblock for larger businesses - especially during peak sales periods when multiple promotions are running across different collections or campaigns.
Discount Combinations
Shopify does support discount stacking in some cases, but the rules are limited. Combining multiple order-level discounts can be tricky, and not all codes work together. For example, you can use only up to 5 product or order codes, plus 1 shipping discount, per order.
No clear front-end discount promotion
Shopify's discount engine does not provide automatic visual cues or tiered pricing displays on product pages, which can reduce customer awareness of volume discount opportunities.
Limited Targeting and Advanced Rule-Setting
The native discount engine offers only basic customer eligibility rules, such as targeting specific customer segments or locations. It lacks the capability for more advanced conditional logic. For example, you cannot create a discount that applies only to customers with a specific lifetime spend
2. How to Set Up Volume Discounts with a Shopify App
While Shopify native discounts are great, as we saw, they come with limitations. If you want to set up a volume discount campaign, where you have full control over targeting, set up, rules, and the front-end, a volume discount app is the way to go.
There are many volume discounts on Shopify. One volume discount app I would highly recommend is Kite: Discount & Free Gift. This app allows you to create advanced discount strategies, such as tiered discounts, where customers unlock higher savings when they buy more.
Here is a step-by-step guide on how to set up volume discounts on Shopify using the Kite: Discount & Free Gift app:
Step 1: Install Kite: Discount & Free Gift from the Shopify App Store
Click Install and follow the prompts to add it to your Shopify store.
Once installed, you’ll see Kite Discounts in your Shopify dashboard.
Step 2: Start a Tiered Discount Campaign
On the app dashboard, click on Create New Promotion and select the Tiered Discount.
Now, as shown in the image below, you will see different types, such as "Goal-based tiered discount," "Advanced tiered discount," and "Quick tiered discount."
For this example, we will focus on creating a highly customized promotion, so click Select under Advanced tiered discount.
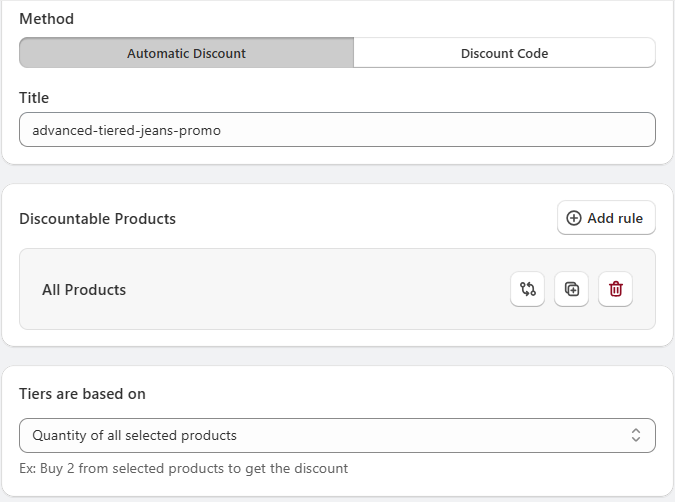
Step 3: Configure the Core Discount Setup
Name Your Campaign: Give your campaign a clear title (e.g., "advanced-tiered-jeans-promo") for easy identification.
Select Discountable Products: In the "Discountable products" section, select which items are eligible for the offer. You can select "All products," or narrow it down by specific collections or product tags.
Choose the Tier Basis: In the "Tiers based on" section, determine what triggers the discount. For example, you can typically select "Quantity of all selected products".
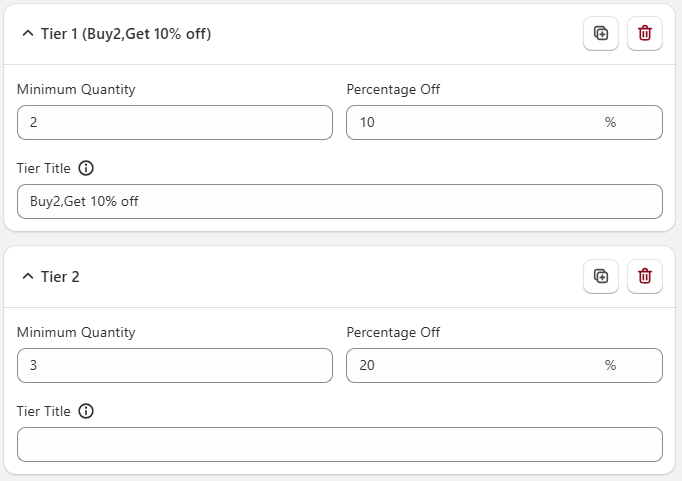
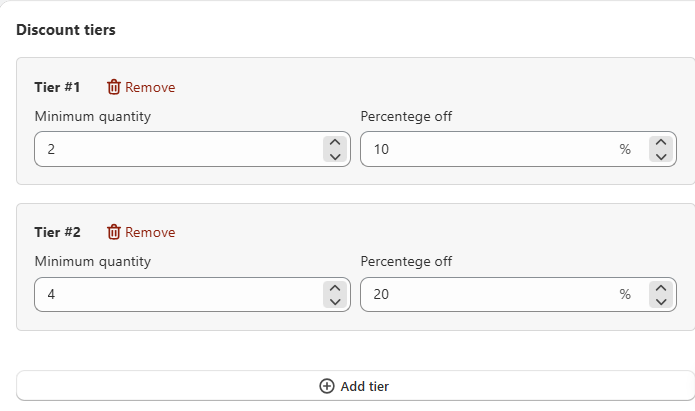
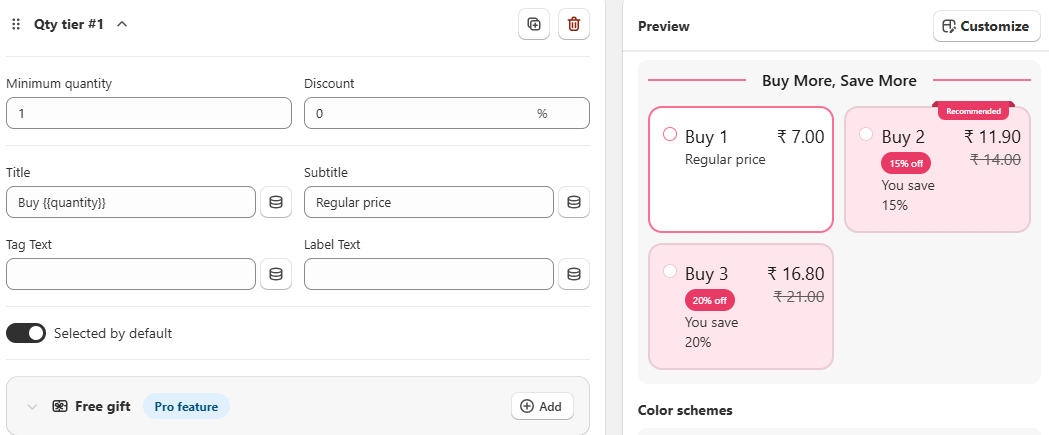
Step 4: Define Your Discount Tiers
This is where you create the escalating discount levels that encourage customers to buy more.
Tier 1: Set the minimum quantity and the corresponding discount. For example, set the minimum quantity to 2 and the discount value to 10%. You can also add a tier title like "Buy 2, Get 10% Off!"
Tier 2: Set the next threshold. For instance, as shown in the image, set the minimum quantity to 3 and increase the discount value to 20%. You can continue adding as many tiers as you require.
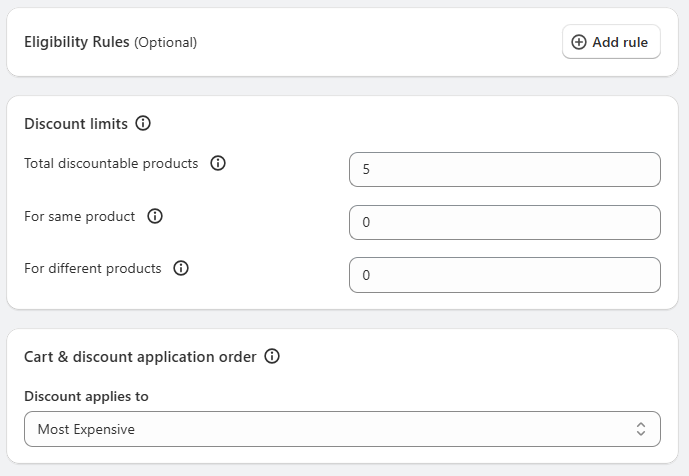
Step 5: Refine with Advanced Optional Settings
Eligibility Rules: Add conditions to limit who can receive the offer. For example, you can restrict the discount to customers with a specific tag (like "VIP").
Limit Discounted Items: You can enter a number to cap the discount to a specific quantity of items in the cart. If left blank, the discount will apply to all eligible items.
Discount Application Logic: If you set a cap on the number of discounted items, you can specify whether the discount is applied to the least expensive or most expensive eligible products in the cart.
Step 6: Save and Test Your Campaign
After configuring all the settings, it's crucial to ensure the discount works as expected.
Click Save to activate your new tiered discount promotion.
Test the discount by adding eligible products to the cart.
3. How to Set Up Volume Discounts within Shopify Checkout?
Offering volume discounts within Shopify checkout is a proven strategy to increase your AOV and move inventory faster. To streamline this process and create a seamless customer experience, you can rely on powerful Shopify checkout apps like Checkout Wizard. This app makes it simple to set up volume discounts right in your Shopify checkout.
Let's see how you can set up volume discounts using the Checkout Wizard.
Step 1: Install the Checkout Wizard app
Head over to the Shopify App Store, search for Checkout Wizard, and install it.
Step 2: Create Volume Discount
Inside the app, navigate to the dashboard and click on Create Extension. Under the list of available extensions, find Volume Discount and click Create.
Step 3: Configure Your Discount Rules
This is where you define the core aspects of your discount:
Products to discount: Choose whether to apply to all products, specific collections, or individually selected products.
Discount type: Choose between a percentage off (e.g., 10% off) or a fixed amount off (e.g., $5 off).
Discount trigger: Decide whether the discount activates by quantity (items in the cart) or subtotal value.
Discount tiers: This is where you create the volume aspect. Click Add tier to set up different discount levels.
Discount Combination settings: Allow (or restrict) the discount to stack with other order-level discounts.
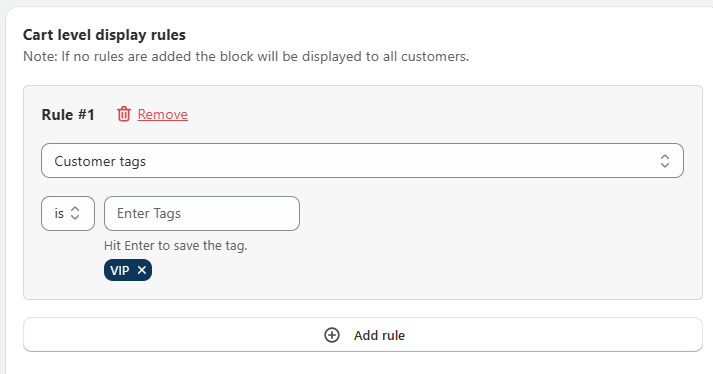
Step 4: Set Discount Visibility
You can set specific rules to show or hide the discount block. For instance, you could display the offer only to customers with a certain tag or those who have specific items in their cart. If no rules are added, the block will be visible to all customers by default.
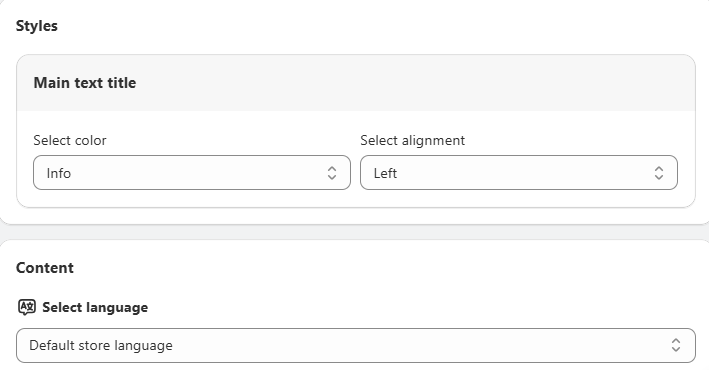
Step 5: Customize Discount Content
Here, you can customize the messaging and appearance of your discount offer to match your brand's voice and style. You can also select different languages to provide a localized experience for international customers.
Step 6: Publish Block
Once everything is configured, click Publish to activate your volume discount block at checkout. Run a quick test order to make sure everything works as intended.
4. How to Set Up Volume Discounts as Quantity Breaks on Shopify?
Quantity breaks are a type of tiered pricing strategy where customers receive increasing discounts as they purchase more units of a product. This approach not only encourages bulk buying but also helps boost your AOV and overall sales.
While Shopify does offer a basic discount system, it doesn’t provide advanced features for quantity breaks. For instance, you won’t be able to set up multiple quantity breaks under a single discount. So, to set up sophisticated Shopify quantity breaks, you can leverage Shopify apps like Fly Bundles & Quantity Break.
Here is a detailed guide to creating quantity breaks using the Fly Bundles app.
Step 1: Install the Fly Bundles App
Open the Shopify App Store, find Fly: Bundles & Quantity Break, and install it. Once installed, it’s available inside your Shopify admin.
Step 2: Set Up a New Bundle Offer
On the main dashboard of the app, find and click the "Create bundle offer" button.
You will be presented with different types of bundles; for this purpose, select "Quantity Breaks" and click Create.
Step 3: Pick a Template
After choosing Quantity Breaks, you’ll land on the “Choose a Template" page. The Fly Bundles app gives you multiple templates to pick from. You can preview each option and tweak the color scheme so it fits naturally with your store’s look and feel.
Step 4: Configure Offer Setup
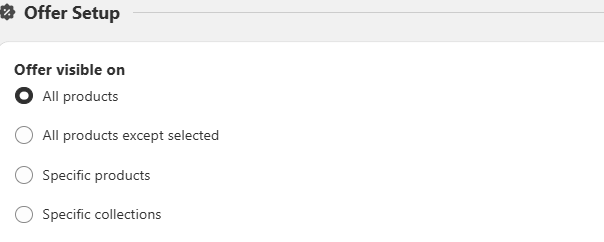
After selecting a template, you'll be taken to the main setup page. The first step is to add the products to which you want to apply quantity breaks. You can choose to make the offer visible on specific products, specific collections, all products except for selected ones, or all products in your store.
Step 5: Define Volume Discount Tiers
This is where you will create the actual discount structure. You can choose between offering a "Percentage Off" or a "Fixed Amount Off" for each tier.
For each level of the discount, enter the minimum quantity of items a customer must buy to qualify.
You can create multiple tiers by clicking the 'Add Tier' button. The live preview will update as you make changes.
Additional customizations are available, such as changing the display from swatches to a dropdown menu, giving your offer a title, and even adding a free gift to a specific tier to make it more appealing.
Step 6: Configure Discount Settings
You will need to enter a Discount Name. This name will be visible to customers in their cart and at checkout, and it will also help you track the promotion in your Shopify discounts dashboard.
Under the Combinations section, you can decide if this discount can be combined with other active promotions, such as order-level, product, or shipping discounts.
Step 7: Customize the Display
Enter an Offer Title. This is the text that will appear as the heading for your quantity break widget.
Step 8: Configure Additional Settings
The app provides several advanced settings for fine-tuning. You can customize the label for any free gifts, choose to show a "compare at price" to highlight the savings, and display out-of-stock options.
Step 9: Save Your Quantity Break
Once you're done with the whole setup, click “Save” to save the quantity break offer.
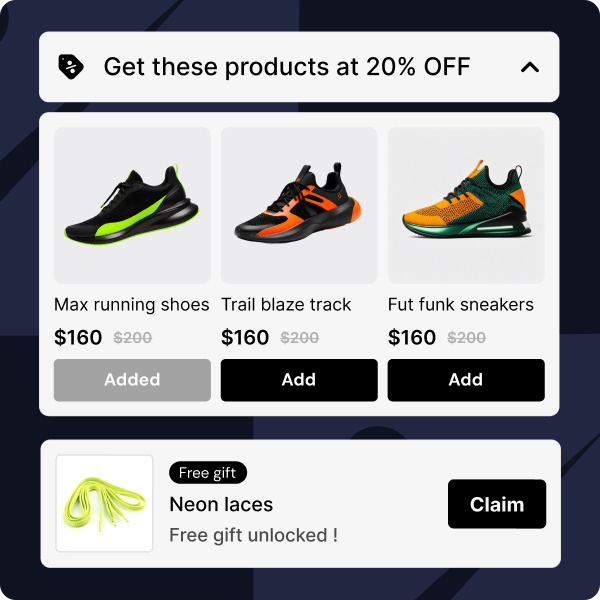
Why Offer Volume Discounts to Your Customers?
Here are a few reasons why setting up Shopify volume discounts can be a smart move for your store:
Boosts Your Average Order Value (AOV): Encourages customers to buy more per order to unlock savings, increasing your revenue per transaction.
Optimized Inventory Management: Helps clear slow-moving or seasonal stock efficiently without deep clearance sales.
Attract New Customers: Volume deals catch the eye of first-time buyers and make your store more competitive.
Reduce Cart Abandonment: Volume discounts motivate customers to complete purchases instead of leaving items in their cart.
Strengthen Customer Loyalty: Shoppers appreciate value-driven deals, leading to repeat purchases and stronger brand trust.
Types of Shopify Volume Discounts with Examples
Let’s take a look at some of the widely used Shopify quantity discounts:
1. Threshold Volume Discounts
Discounts activate when a customer meets a minimum quantity or cart value.
Example
Buy 12+ notebooks → Get 20% off
Spend ₹15,000 on home decor → Get ₹2,500 off
2. Quantity Tier Discounts
Shoppers get better deals as they buy more units, encouraging bulk purchases. In Shopify, tiered pricing can be set up as follows:
Fixed Price: 1 protein bar = ₹250, Buy 12+ = ₹210 each
Buy X, Get Y: Buy 2 vitamin bottles → Get 1 free
3. Cumulative Volume Pricing Discounts
Rewards based on total purchases over time, not just per order.
Example: Spend ₹40,000 in a quarter → Get 15% off all orders next month
4. Spend-Based Tier Discounts
Discounts based on total spend, not quantity.
Example:
Spend $100 → Get 10% off
Spend $200 → Get 15% off
Spend $300 → Get 20% off
Conclusion
To wrap it up, learning how to set up volume discounts on Shopify is one of the smartest ways to drive sales and lift your AOV. By offering customers better deals as they buy more, you give them a strong reason to increase their order size.
You can create simple volume discounts directly in Shopify or unlock more advanced features with Shopify apps like Fly Bundles, Kite Discounts & Free Gift, or Checkout Wizard to maximize sales. Remember, don’t just limit yourself to regular volume discounts. Explore quantity breaks or even volume discounts at checkout. All the best!
Hurrify customers to buy within a given timeframe with a sales countdown timer & improve conversions
Another popular Shopify checkout app is Checkout Promotions. The app comes with the ability to leverage a collection of highly robust visibility rules that help show customers one-click post purchase upsell promotions after an order payment has been made. Some of its key features include:
Features
AI recommended and manual recommendations for upselling.
Complete branding control.
Checkout Upsell for increasing AOV.
AI recommended and manual recommendations for upselling.
Pricing
Development
Free
Monthly Plan
$99/ month
Plus Plan
$99/ month
Plus Plan
$99/ month
FAQ’s on How to Set Up Volume Discounts on Shopify
Do Shopify volume discounts apply to all products?
How do I promote my Shopify volume discounts?
Which apps are popular for volume discounts on Shopify?
Does volume pricing hurt margins?
Can volume discounts on Shopify stack with other discounts?
Can Shopify volume discounts help with inventory management?
×
Neetika M
Neetika is the founder of Skai Lama. Passionate about building SaaS, Product Development, and Marketing, she talks about eCommerce Growth, Product Bundling, Gifting, Retention, and Shopify.

.svg)
.svg)

.svg)


.png)
.png)
.jpg)

.svg)


.svg)


.svg)


.svg)


